
How to Sew a Zip and Lining Simultaneously

It is best to just try out the method on a small item such as a coin purse to start with. The secret to sewing zips in with this method, is to start with a zip which is a minimum of 2″ longer than the required finished size. It doesn’t matter if it is longer than that. Indeed you may find it easier if it is! I have given you as much fine detail about the process as possible, in order to help you get a good result.
- Prepare the front and the back of the purse first, by doing any piecing, applique and quilting.

Only quilt through the main fabric and the wadding. Trim the front and back to exactly the same size, then cut linings to the same measurement.
I have quilted simply, in straight lines, spacing the lines at 1/2″ and 3/4″ apart. A little free machining on the printed rose just adds some depth.

Place the front of the purse, right side up on the table, with the zip centred, right side down. Match the top edge of the purse zip with the top edge of the purse.

Next, place the lining, wrong side down, on top, covering the zip and matching all edges. Pin, securing all the layers along the top edge of the zip.

N.B. I use my 1/4″ foot for this technique and have centred the left hand “prong” of the foot on the zip teeth, approximately 1/2″ before the edge of the fabric sandwich. (In fact I have started about 1″ away, as you can see in the photograph, purely so that you are able to see the position clearly). It is important that you observe this on your machine with your zip, so that you can then see how much of the zip/purse lies to the side of the right prong of the 1/4″ foot.
Keep your eye on that position, maintaining it as you sew carefully down the side of the zip. This is your guide for sewing in a straight line. At the end, remove it from the machine and pull the lining over to the back, where It will now lie against the wadding.

Top stitch along the edge of the zip from the front of the work. I find that if the left prong of the machine foot now runs along the side of the zip teeth, I obtain a close top stitch which looks good and also prevents the lining getting caught in the zip. Pull the zip along and you will see that it runs smoothly.
Repeat the whole procedure with the back of the purse, i.e;
1. Place the back of the purse, right side up, on the table.
2. Centre the zip, wrong side down, matching the top edge of the back of the purse with the top edge of the zip. (This time the zip is now attached to the purse front, of course)! Ensure that all edges match.
3. Place the lining, wrong side down, on top, matching all edges. Pin; stitch; and top stitch.

Next, pull back the zip-pull into the centre, and machine stitch across the left edge where the zip gapes open.
This will keep the zip teeth close together. It could also be hand stitched. (See photo above)

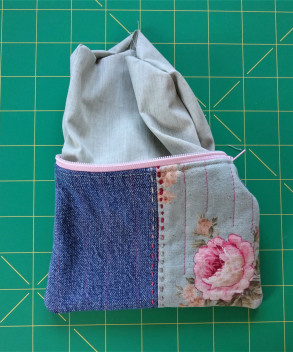
Pin the two linings RS together and the back and front of the purse RS together. You will notice that the zip teeth naturally want to face towards the lining part of the purse…this is correct. Ensure that the teeth lie closely on top of each other at both ends of the zip.
Draw a pencil line guide, for stitching on, along the top edge of the lining, 1/4″ from the edge, leaving a gap in the centre. (Shown in the photo above).
N.B. Start and finish stitching at the sides of the gap, reinforcing the stitching at the start and the end. When you get round to the zip, it may be rather difficult to ease the foot over the thickness of fabric and zip. (I am using denim as one of my fabrics, so it is very thick).

In fact the foot may come to a full stop against it. An invaluable aid is amusingly called a “jean a ma jig” …or other trade names such as “hump jumper” or "clearance plate". I work with denim a lot, and frequently use this.
In the photograph above, you can see that I have placed a "jean a ma jig" under the foot, in the same orientation as the spare one at the front of the photograph. When in position it will lift the foot to a higher level, and enable the machine to continue stitching, without any skipped stitches.
N.B, It is really important to remember to lower the presser foot lever, after it has been placed in position, even though there may notice no discernible difference, otherwise the threads will tangle and knot when you start stitching again.

When the foot has crossed the thick seam and starts to dip down on the other side, lift the presser foot lever again and remove the little tool. Now place it under the front of the foot. Stitch another few stitches, until you can tell that it is no longer necessary when you can remove it again.
Continue stitching until you reach the zip at the other side. Repeat the whole process, then continue stitching until you reach the gap again. Remove from the machine. Trim the ends of the zip and the corners.
Pull the purse through the gap to the right side. Use a blunt tool to push out the bottom corners of the purse while the gap is still open. Then close the gap, and push the lining down into the purse, again pushing out the corners at the bottom and top of the purse. I use my finger to push up at the closed end of the zip. You can really “square up” that corner, and ease the open top corner of the zip, easing the lining down flat against the body of the purse.

The final photograph above shows the finished purse with, possibly my favourite tool. It is called a “Purple Thang”. It has a pointed end and a square end, and I use it for pushing out corners; helping me to turn narrow tubes such as (arms and legs) through to the right side before stuffing! It is invaluable. I make many small, and often fiddly artefacts, and wouldn’t be without it.
Tutorial and photographs by Di Wells
For more news and tutorials view Di's blog here !
Got any projects or tutorials you'd like us to share? If you're interested in collaborating with us, please email Olivia.Sewell@cottonpatch.co.uk.
Happy Creating!


Comments